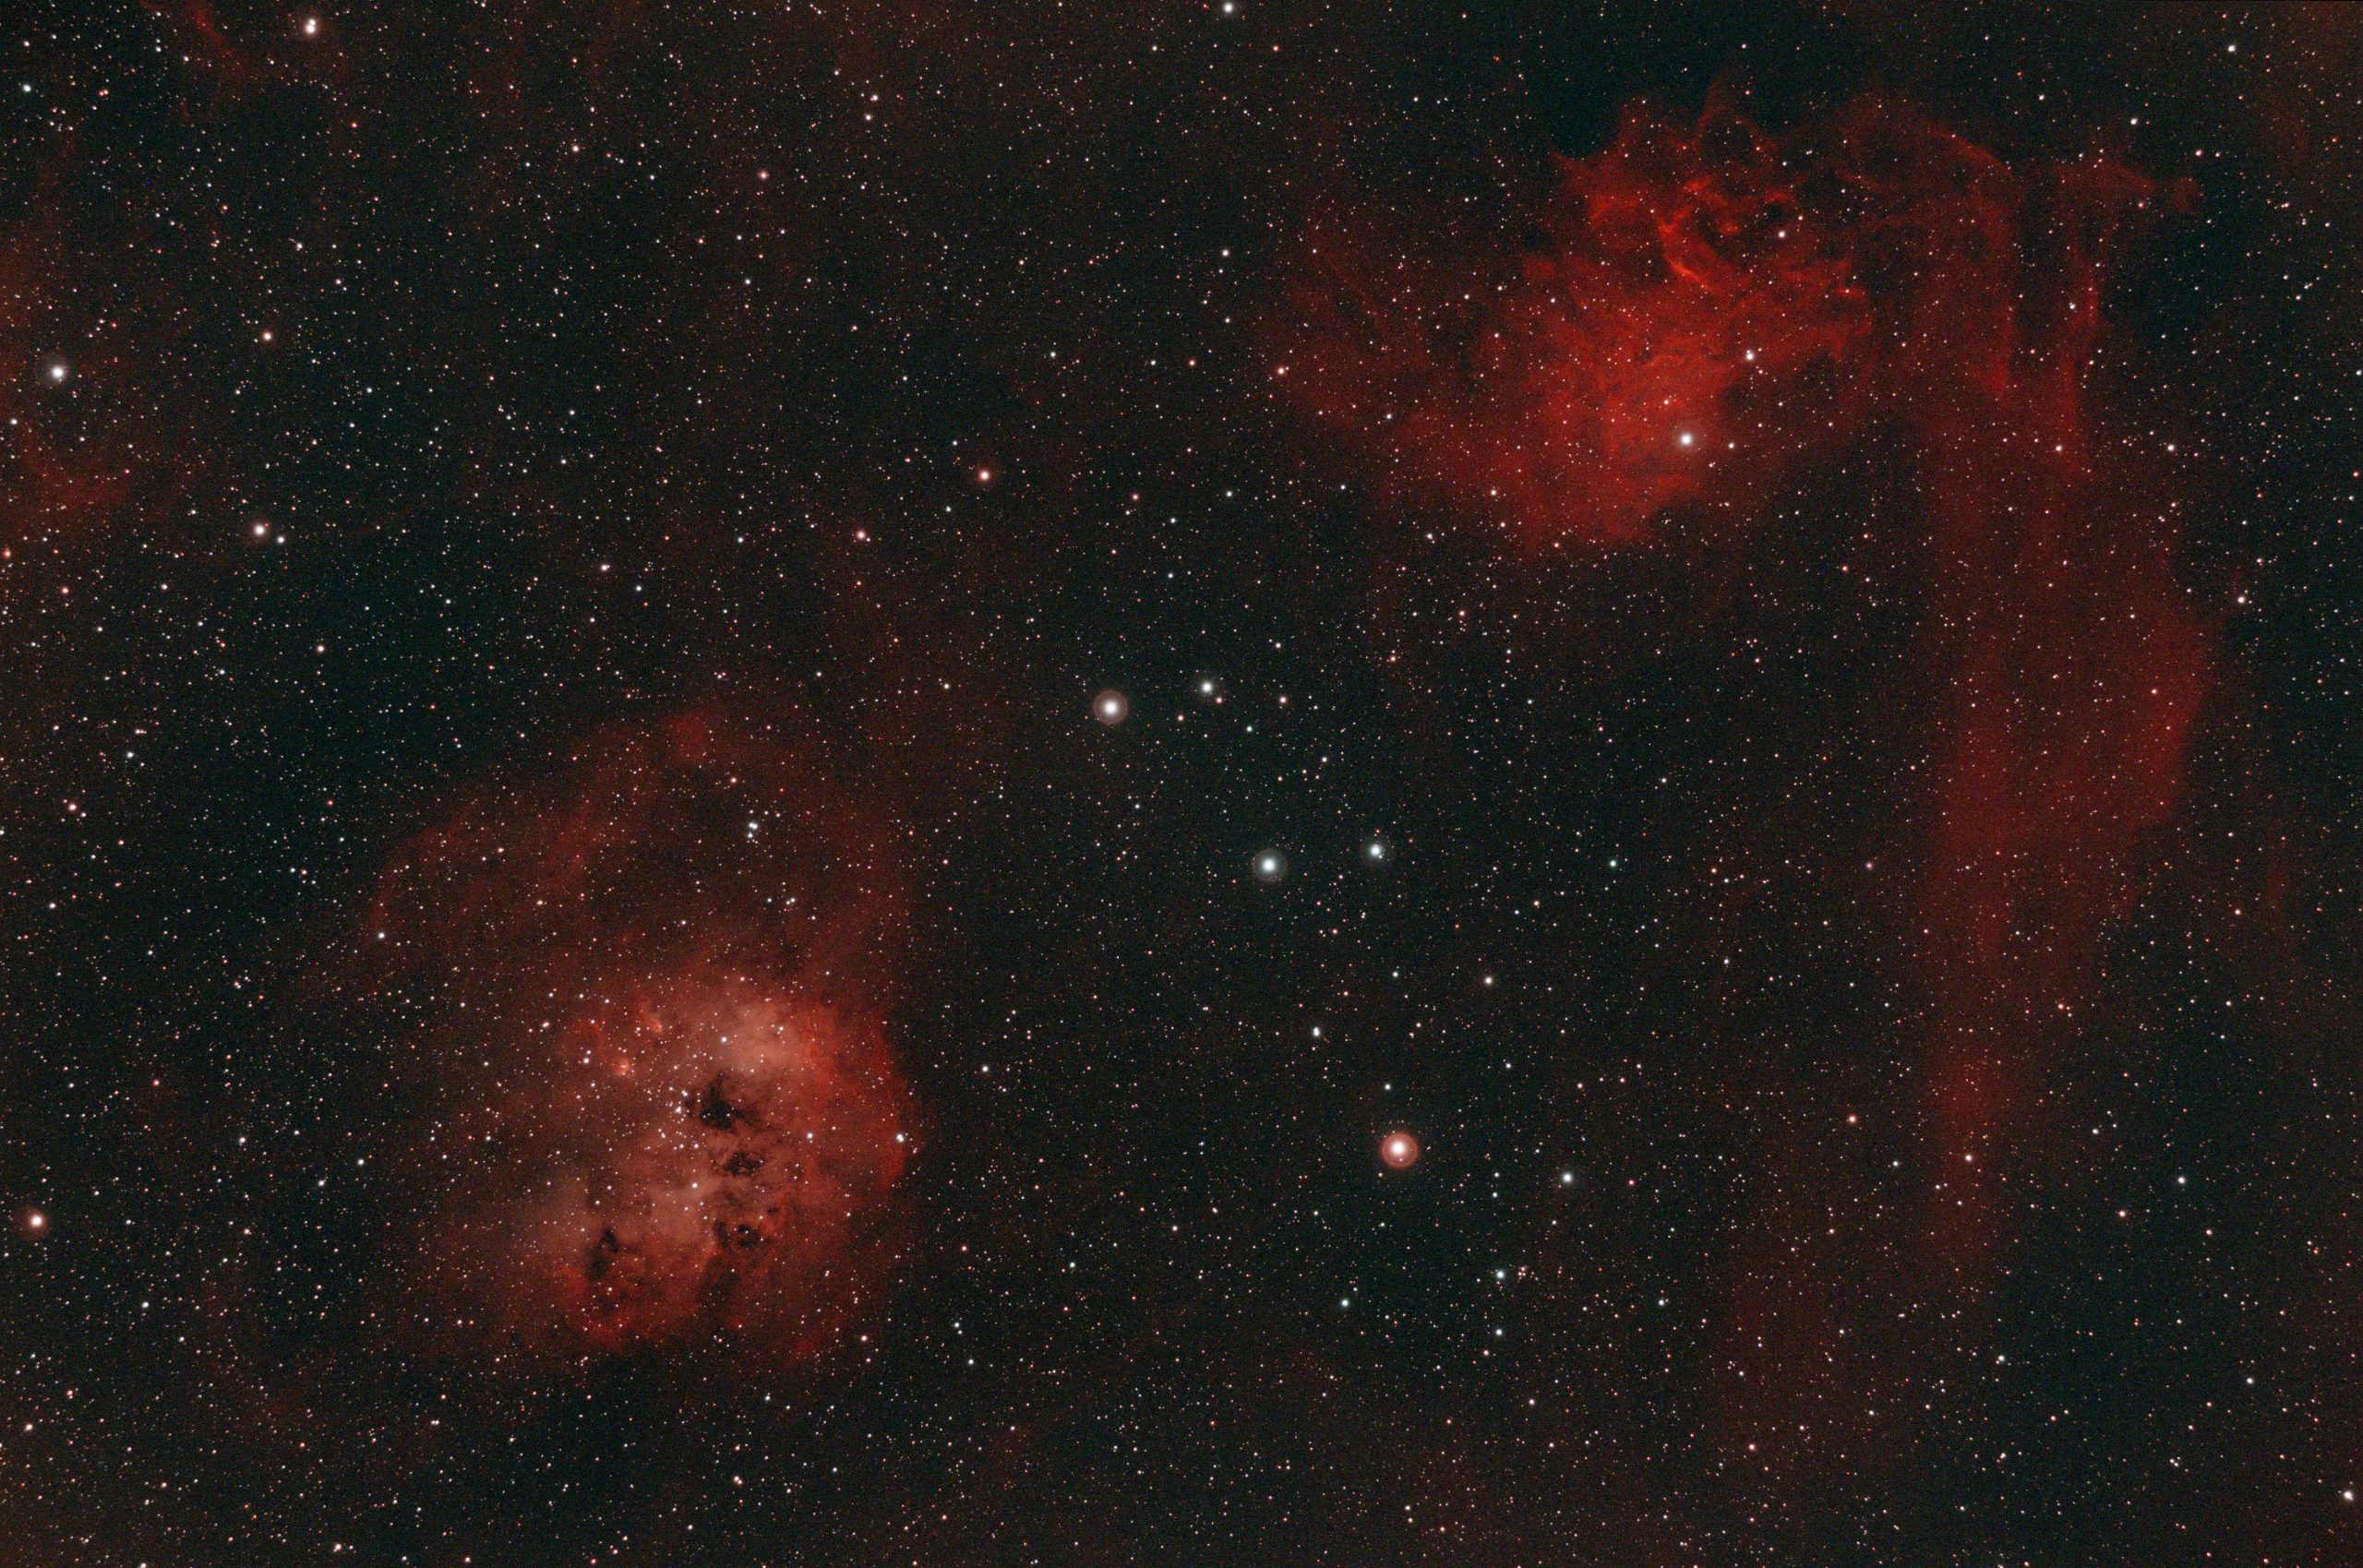
Two nebular regions know as the Tadpole nebula on the left and the Flaming Star nebula on the right. These two heavily hydrogen rich regions are excited by the stars near them and radiate light at a wavelength of 656.28 nm which puts it firmly in the red part of the spectrum. Portions of the Tadpole Nebula (named after the tiny tadpole looking structures in the upper left part of the main body of that nebula) radiates light at 500.7 nm in the blue part of the visible spectrum from the excitation of oxygen. The Flaming Star nebula on the right doesn’t contain significant amounts of oxygen so this region is strongly red but what it lacks in color variety it makes up with complex textures. This region is about 3 degrees wide and 2 degrees tall so this field of view. For comparison the full moon is about half a degree wide.
IC410 2021-01-04
Allen, Texas, US
AstroTech AT65EDQ
QHY168C
Optolong L-eXtreme
One of the things that we as amateur astrophotographers have to contend with is the ever invasive light pollution of the areas we live in. If you’re particularly unfortunate, you live in an area with large built up complexes. I have 18.7 million square feet (1.7 million sq. meters) of fully illuminated retail parking and a further 10.5 million square feet (972,000 sq. meter) of fully illuminated city sporting complex not counting the high intensity flood lights during events. All this from the comfort of my Bortle 8 back yard, which in all likelihood is now Bortle 9.
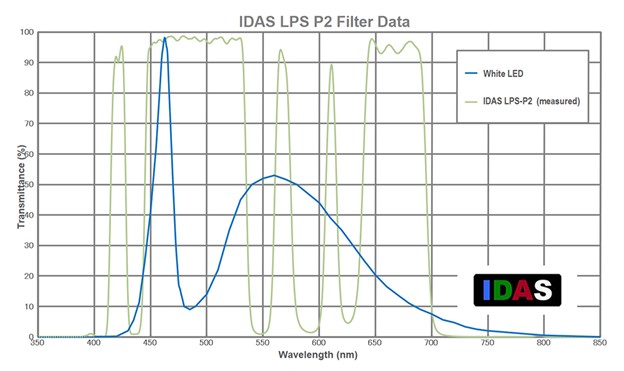
Long, long ago when I got into astrophotography the only thing we really needed to contend with was sodium and mercury lamps. Because those lamps generate their light from energized gasses they emit light in very specific frequencies that are filtered with relative ease. With the advent of low power, high intensity LED lighting we now face a new problem. LED lights emit broad spectrum light, not light at a specific frequency. This makes filtering them nearly impossible. The best strategy for those of us trapped in an urban area is to use very aggressive filters which realistically only allow us to image emission nebulae from deep inside the city. Reflection nebulae and galaxies are possible but the amount of detail we can get inside the city is dramatically reduced.
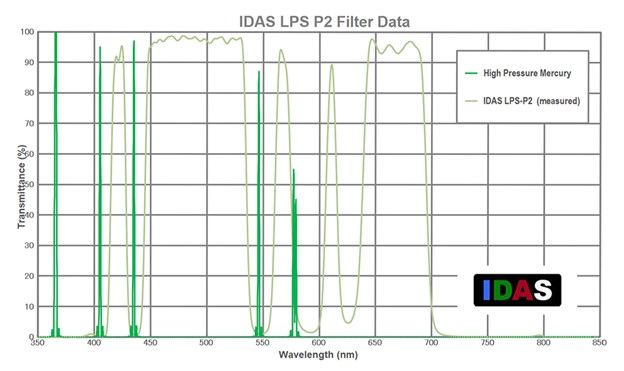
So, how do some of these new weapons to combat light pollution stack up? Curious minds want to know and I have a curious mind. Back in ye olde days I used a Hutech IDAS LPS-P2 with fantastic results. I was able to image to my heart’s content with little difference between my backyard and darker sites since a majority of the lighting around me was low pressure sodium and mercury vapor lamps. Those give very specific frequencies of light in very narrow bands. High pressure sodium is emits a pseudo-broadband spectrum but there wasn’t that much around me. My trusty Hutech IDAS LPS-P2 was able to filter a vast majority of that before it made much impact on my DSLR.
As time moved on, cities grew, and the politically correct demanded that we move to lower power LED lighting. My LPS-P2 was now starting to struggle to make any kind of respectable image. Camera technology changed and sensors became cheaper. Dedicated CCD camera prices started to come down to a price that mere mortals such as myself could start to afford. The extra sensitivity of the camera combined with the widespread use of broadband LED has basically made the LPS-P2 near useless. My maximum exposure time was now dominated by light pollution limits rather than all but the brightest stars saturating the sensor. There was literally no way to get anything more than the slightest hint of the nebulosity I wanted to image.
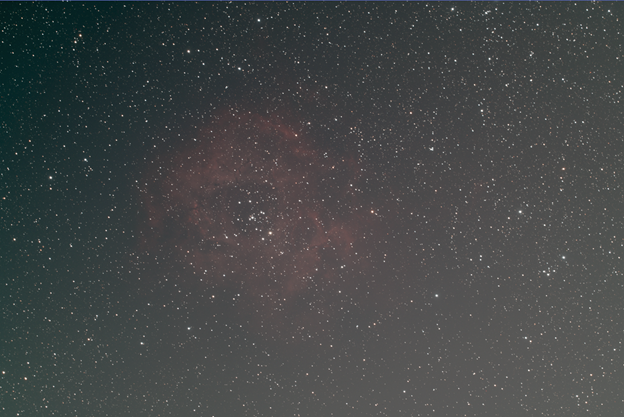
With all those unpleasantries out of the way, let’s get down to why I brought you here. These images aren’t intended to be an example of what you can do with these filters, only where your starting point to final processing will begin. They attempt to represent both the challenge and the path I’ve taken to try and mitigate the light pollution problem while doing what I can to enjoy this hobby as much as possible from my back yard. As a point of reference, my tried and true LPS-P2 doing its darnedest to try and cope with the light pollution that has crept in over the years. It’s not as uniformly corrected as I expected it to be (none of them are, really) but the size and definition around the nebulosity is the point of interest anyhow. All data was collected on consecutive nights given the limitations that I have shooting between houses and trees where NGC2244 is in my local sky. This data was captured between December 16th and 19th from my Bortle 8/9 back yard. The telescope used was a Celestron Edge HD 8” with a Starizona Hyperstar v4 and a QHY 168C one shot color CMOS camera running at -10C. These were taken at the same time of day so the same part of the sky was to blame for the degree and position of the impeding light pollution. The only processing done was to calibrate and stack all the subexposures that didn’t have gross abnormalities in FWHM measurements. Once stacked the resulting image was automatically equalized and streteched using Pixinsight’s AutoHistogram and AutoStretch processes. This helps demonstrate what kind and how much light pollution is being mitigated.
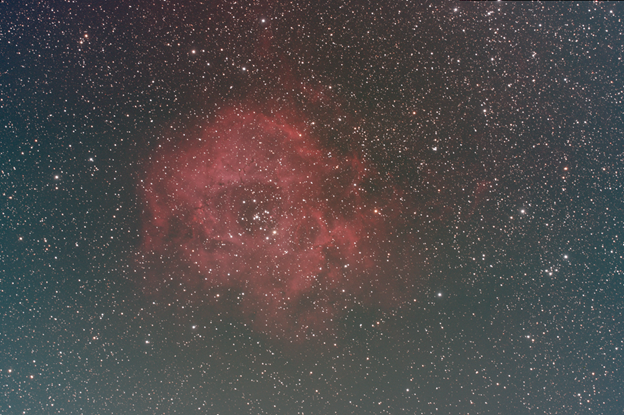
First up, the reference image. This is NGC2244 with the IDAS LPS-P2 that served me well over for a decade. Light pollution here shows up as both brown murk at the bottom right edge and as generally poor contrast between the sky and the nebulosity of NGC2244. This filter is a broadband filter that effectively eliminates mercury and sodium emissions but allows all other frequencies. I fought with getting good images with this filter for several years before manufactures started to address LED pollution. It honestly made me sad to have to retire this filter. I took many images that gave me great pleasure but it simply is no longer up to the task.
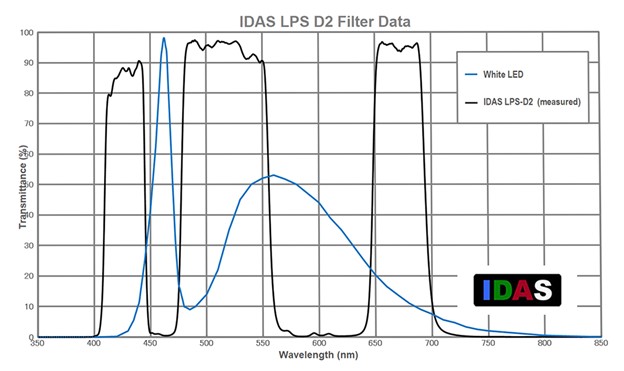
Next on my trail of filters came the IDAS LPS-D2. The LPS-D1 had been out for a while but I didn’t see a significant advantage over the P2. The transmission on the D1 was higher than on the P2 but both filters cut the same spectrum. The difference between them is so slight I couldn’t justify the cost. Then came the D2, a definite improvement and the first filter I found that was designed specifically to help with LED pollution. Because LED light is broadband you can’t truly filter it but you can minimize some of the brightest points as shown in their graph from their marketing material.
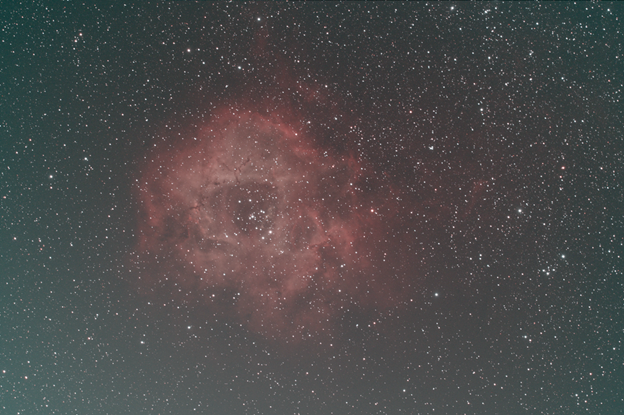
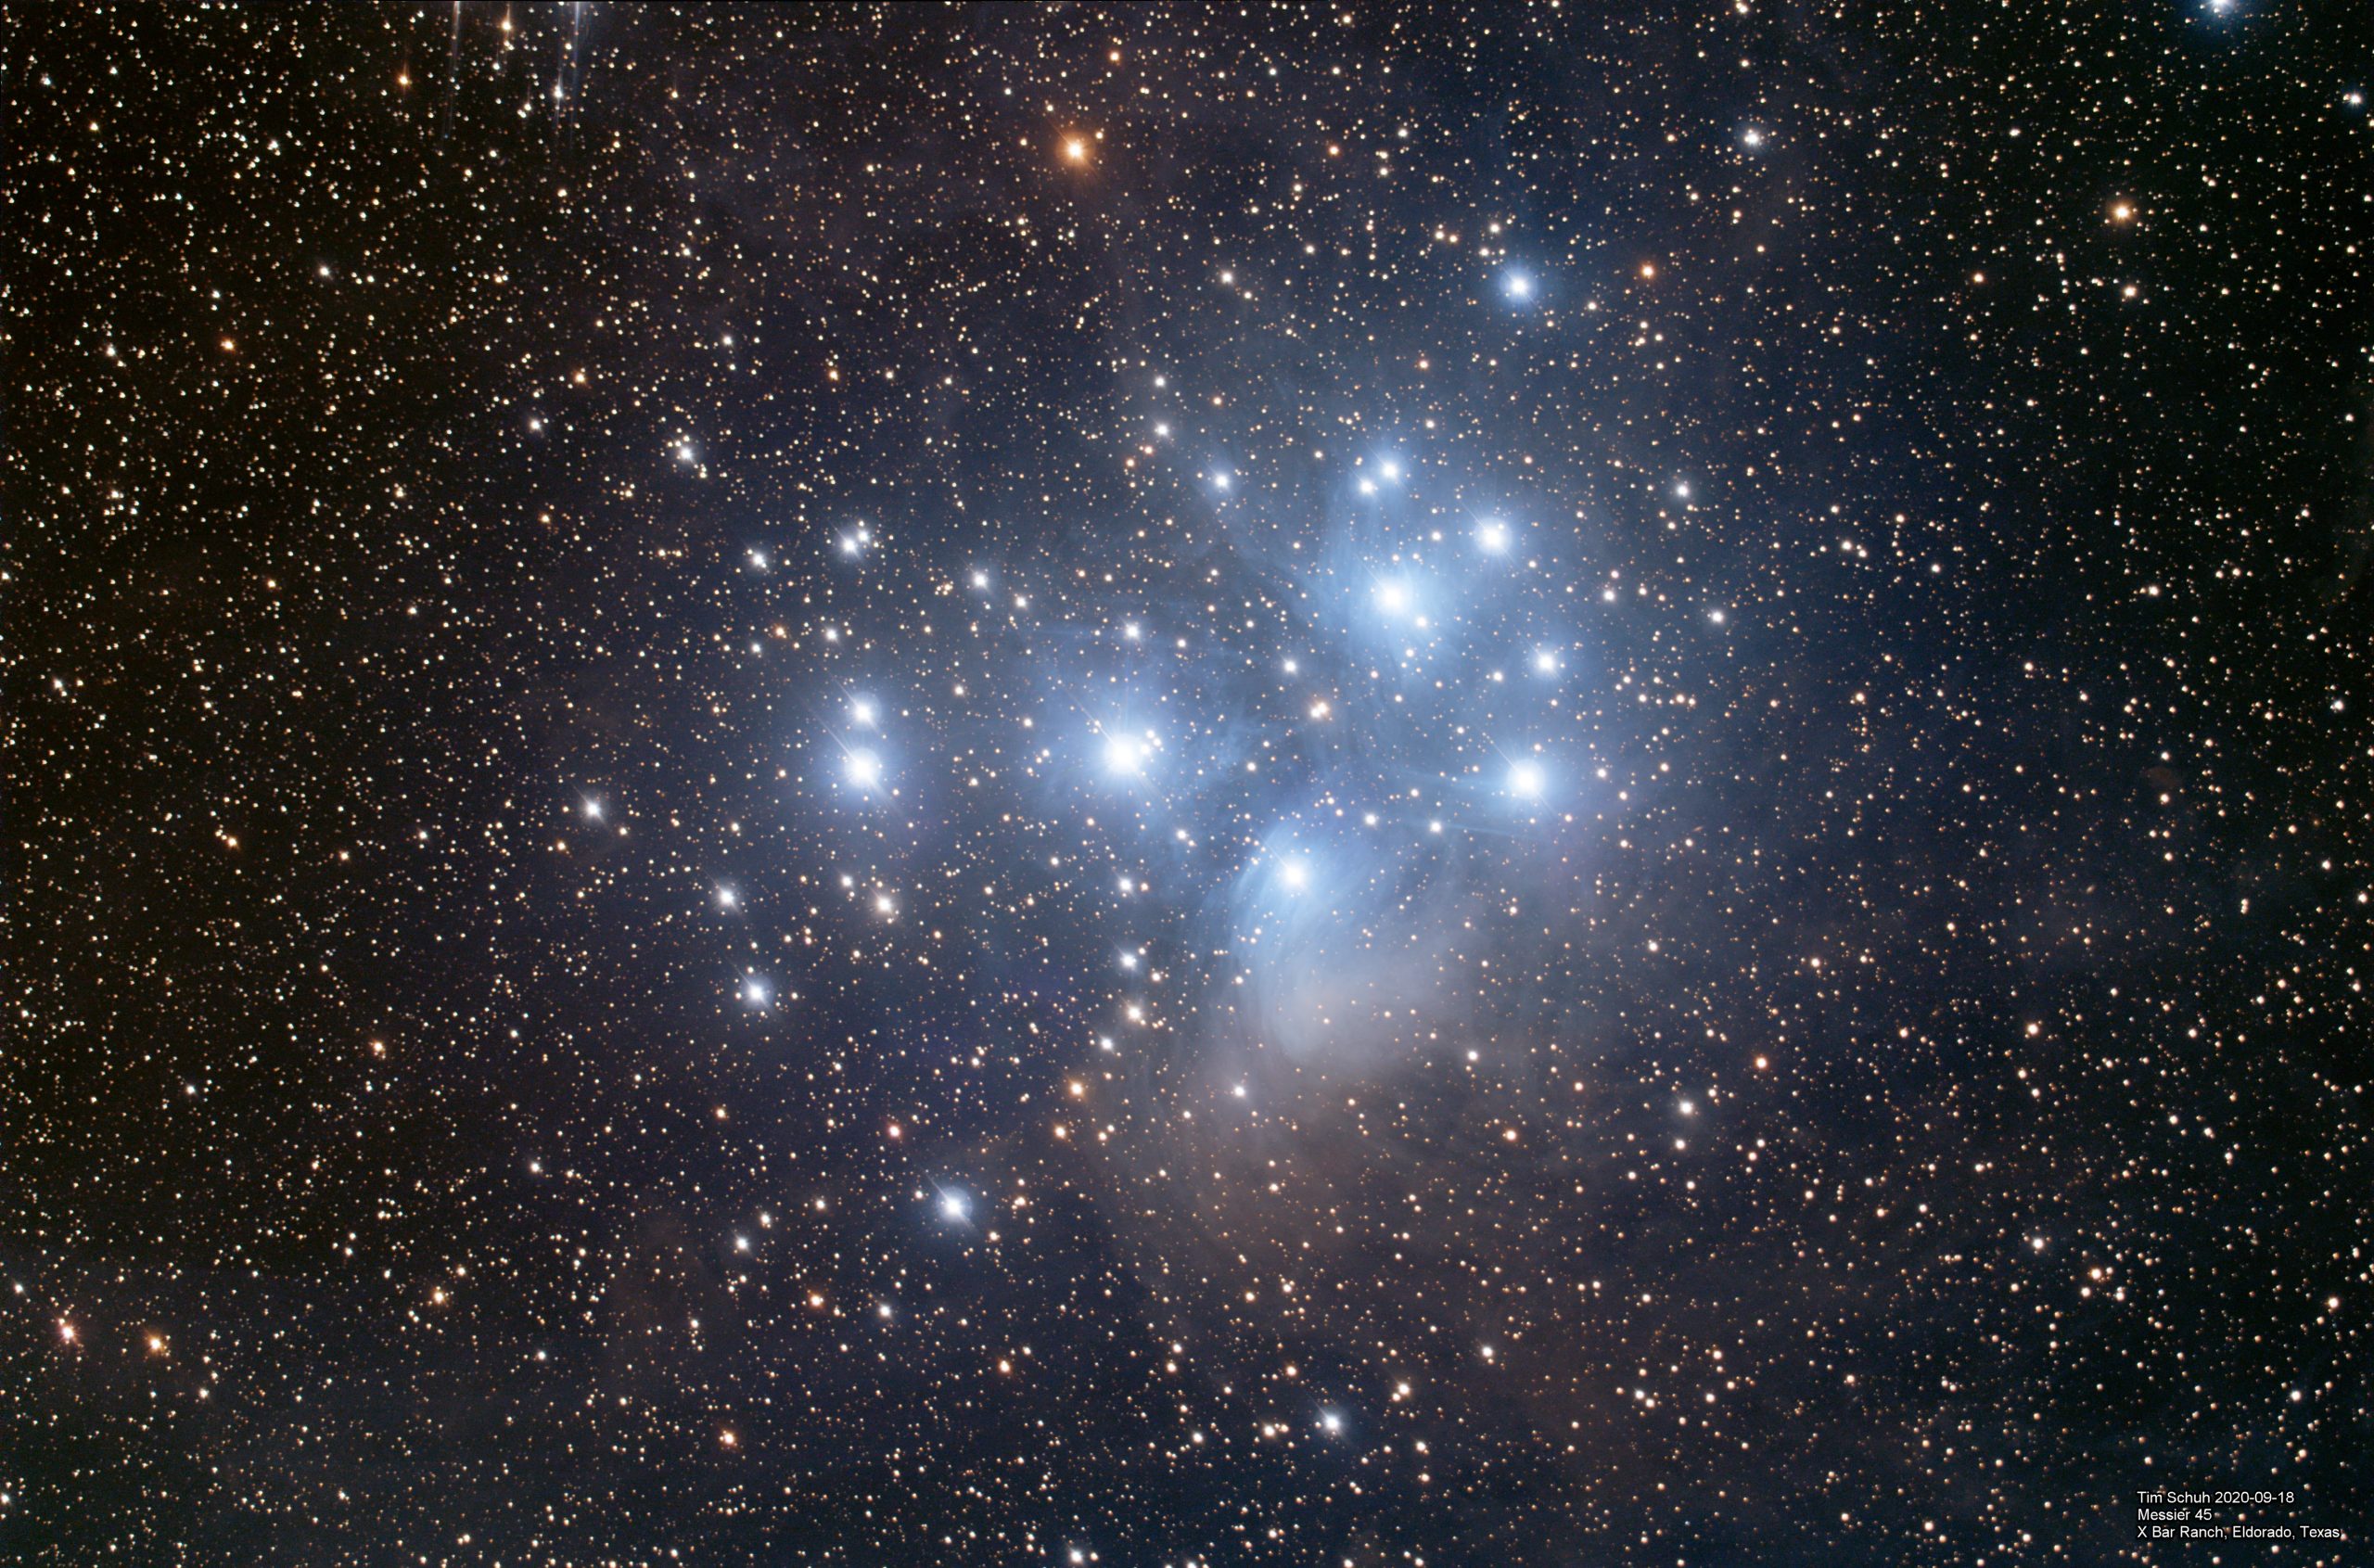
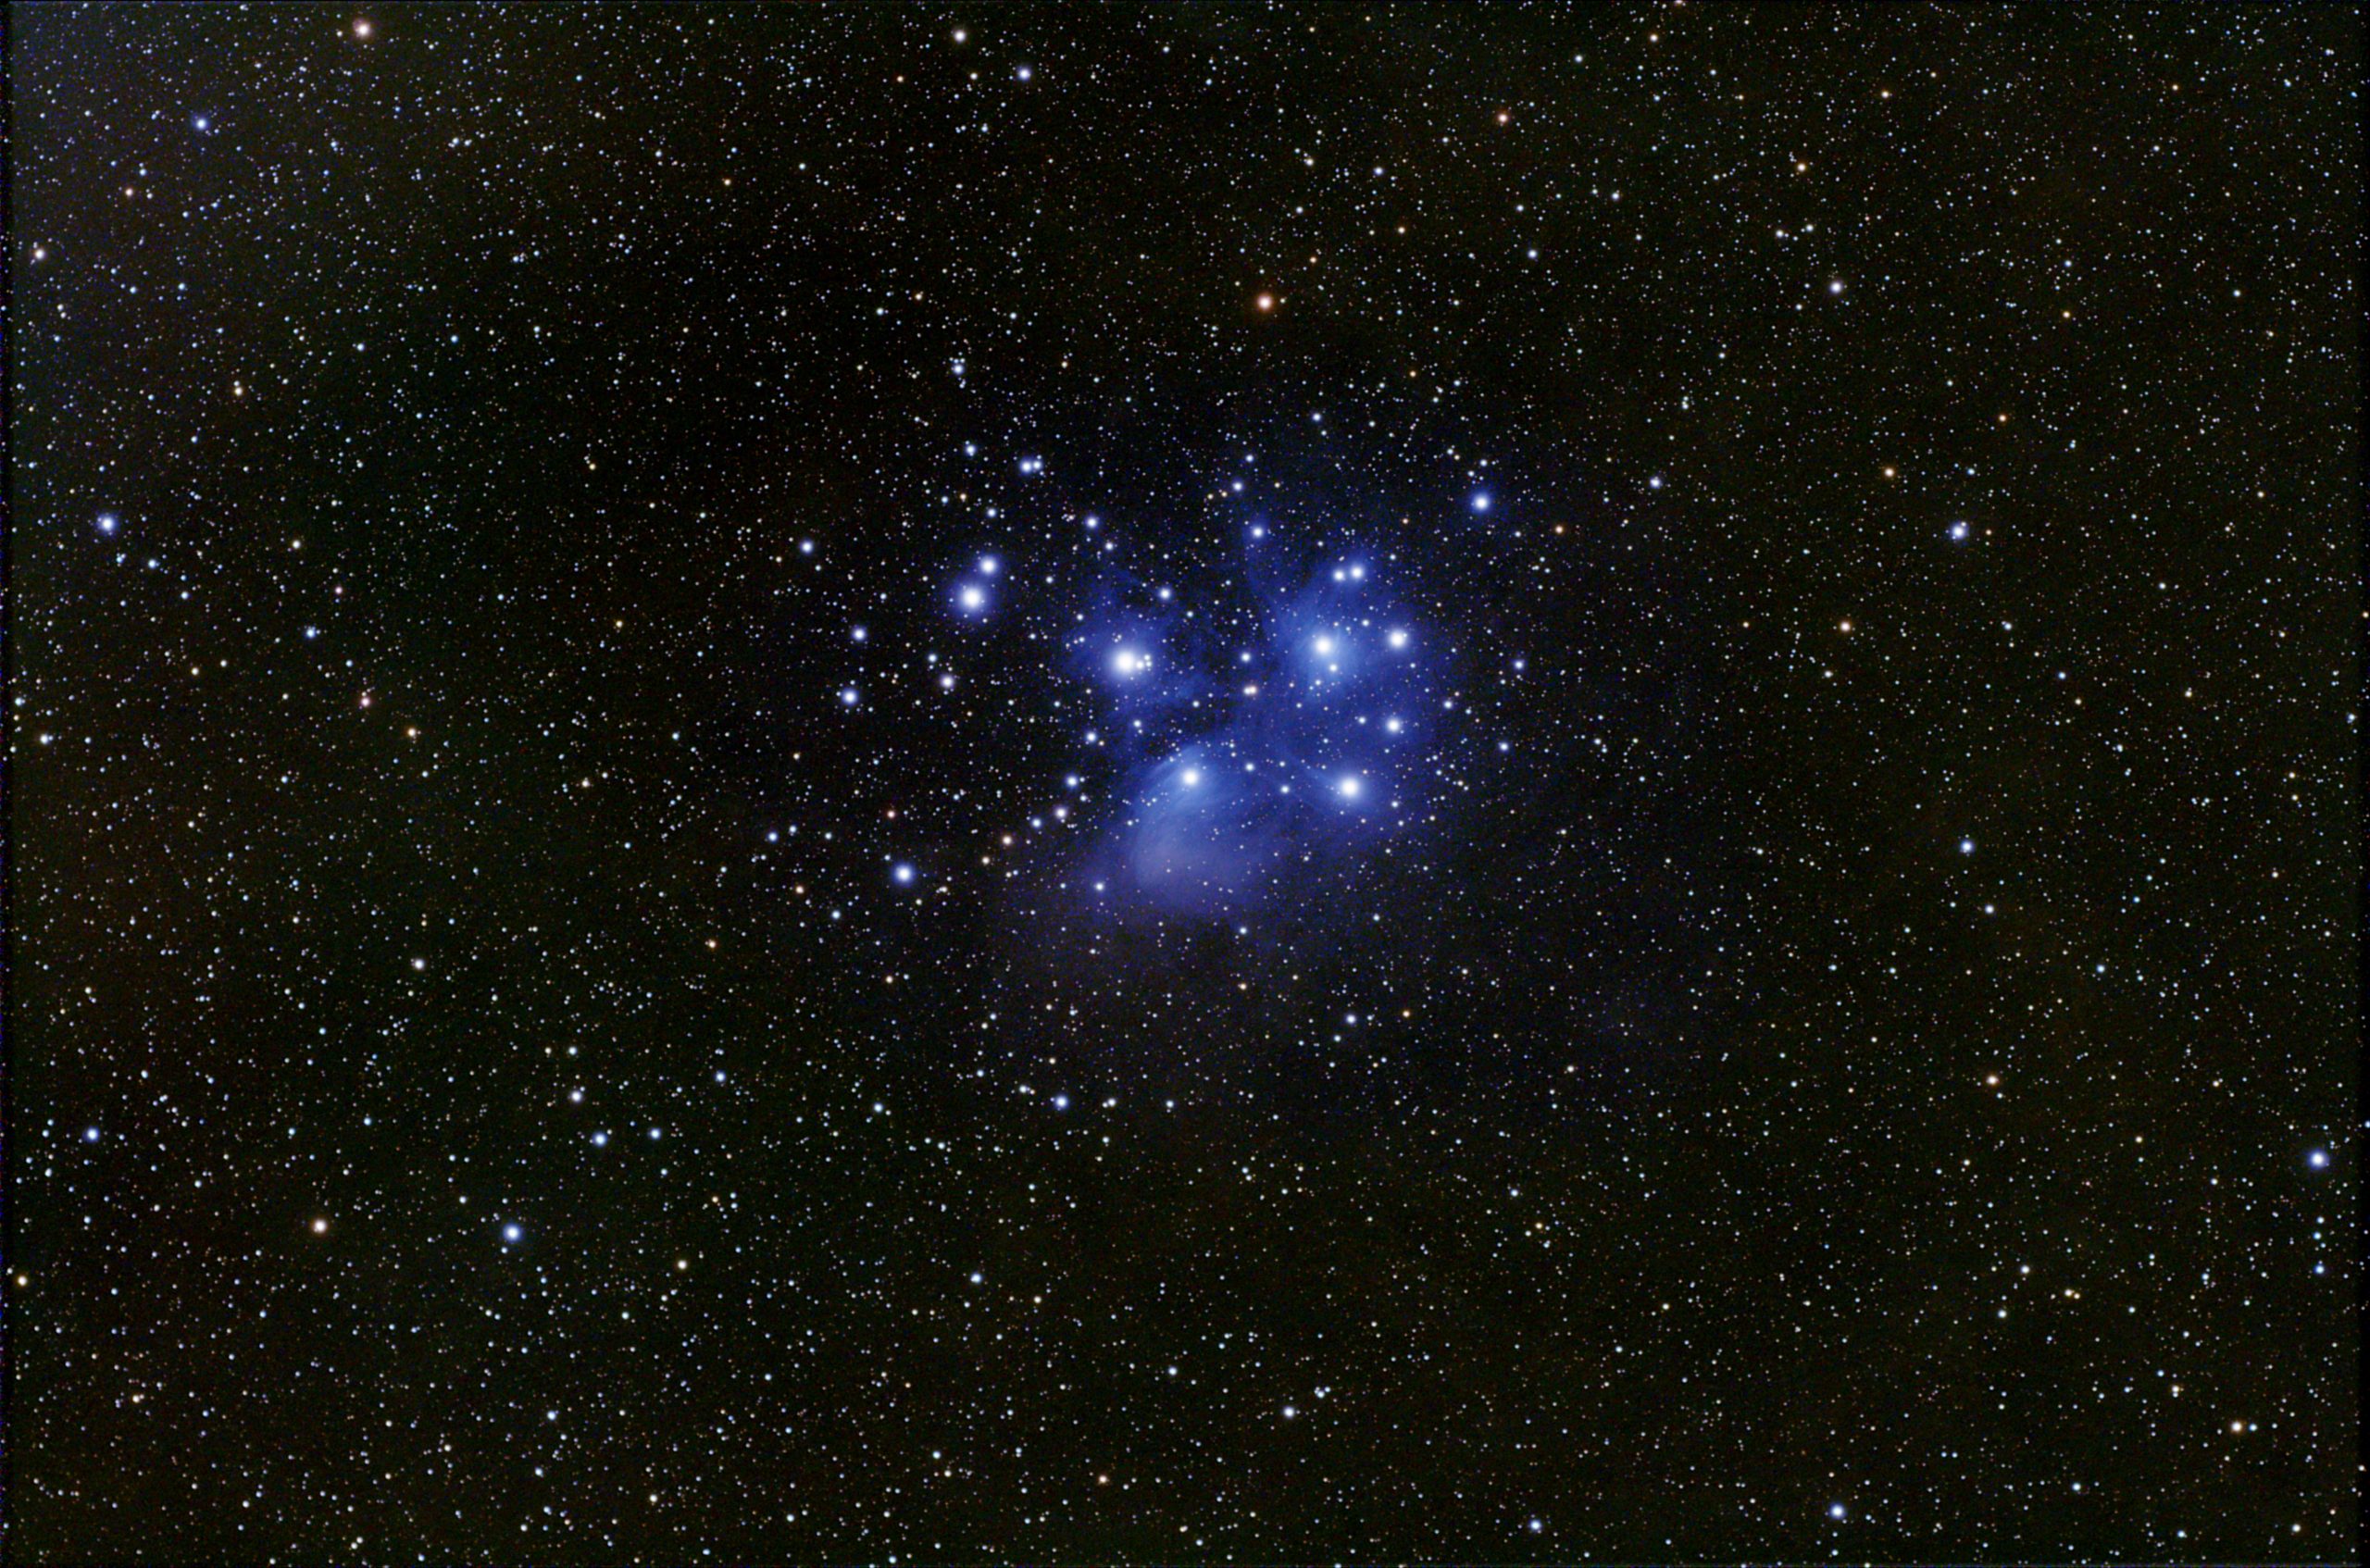
The D2 is a marked improvement over the P2. A good chunk of light pollution has been held at bay. Contrast of the nebulosity is significantly improved. This was a big step forward from the P2 but ultimately I found this filter to be rather monochromatic despite its transmission spectra. Reflection nebulae like the Pleiades seemed to suffer the most. Emission nebulae were improved but ultimately I still needed to drive to the country to get good detail on the fainter parts of the nebulosity.
Eventually we started seeing filters like the Radian Triad and Triad Ultra filters. These were the first of the multispectral narrowband filters that I became aware of. While they held great promise I simply couldn’t afford them at $750 and $1100 respectively. As time went on other manufacturers picked up on that and started producing competitors. I’d not been a huge fan of Optolong after seeing some of their early filters but they came along quickly and seem to have fixed a bunch of QC problems that I still see with other manufacturers. And that brings us to my Optolong L-eNhance that I bought with the Hyperstar at Starizona’s recommendation. I must say I’ve been fairly impressed with the results I’ve been able to get thus far but as you can see there is still room for improvement.
Colors are much more varied on the L-eNhance than on the LPS-D2. The O-iii and H-beta nebulosity is much more evident than in the D2. A bit more light pollution has been blocked with the L-eNhance than with the D2 as well. There is more evident detail in the dust lanes than in the D2 to boot. Finer whisps of detail are much easier to see with this filter than its predecessor, particularly around the core region.
Filters have come a long way since I started imaging. There is also a fair amount of evolution happening very quickly in recent years. Faster telescope systems and imaging components becoming slightly more affordable make it possible to at least do some amount deep sky imaging inside suburban settings, reaching more people than possible a few years ago. The relatively broad bandpass on the L-eNhance compared to its younger brother, the L-eXtreme, likely help contribute to a relatively well-rounded color presentation on a majority of imaging targets. That is yet to be seen firsthand. My L-eXtreme should be here in the next few days.
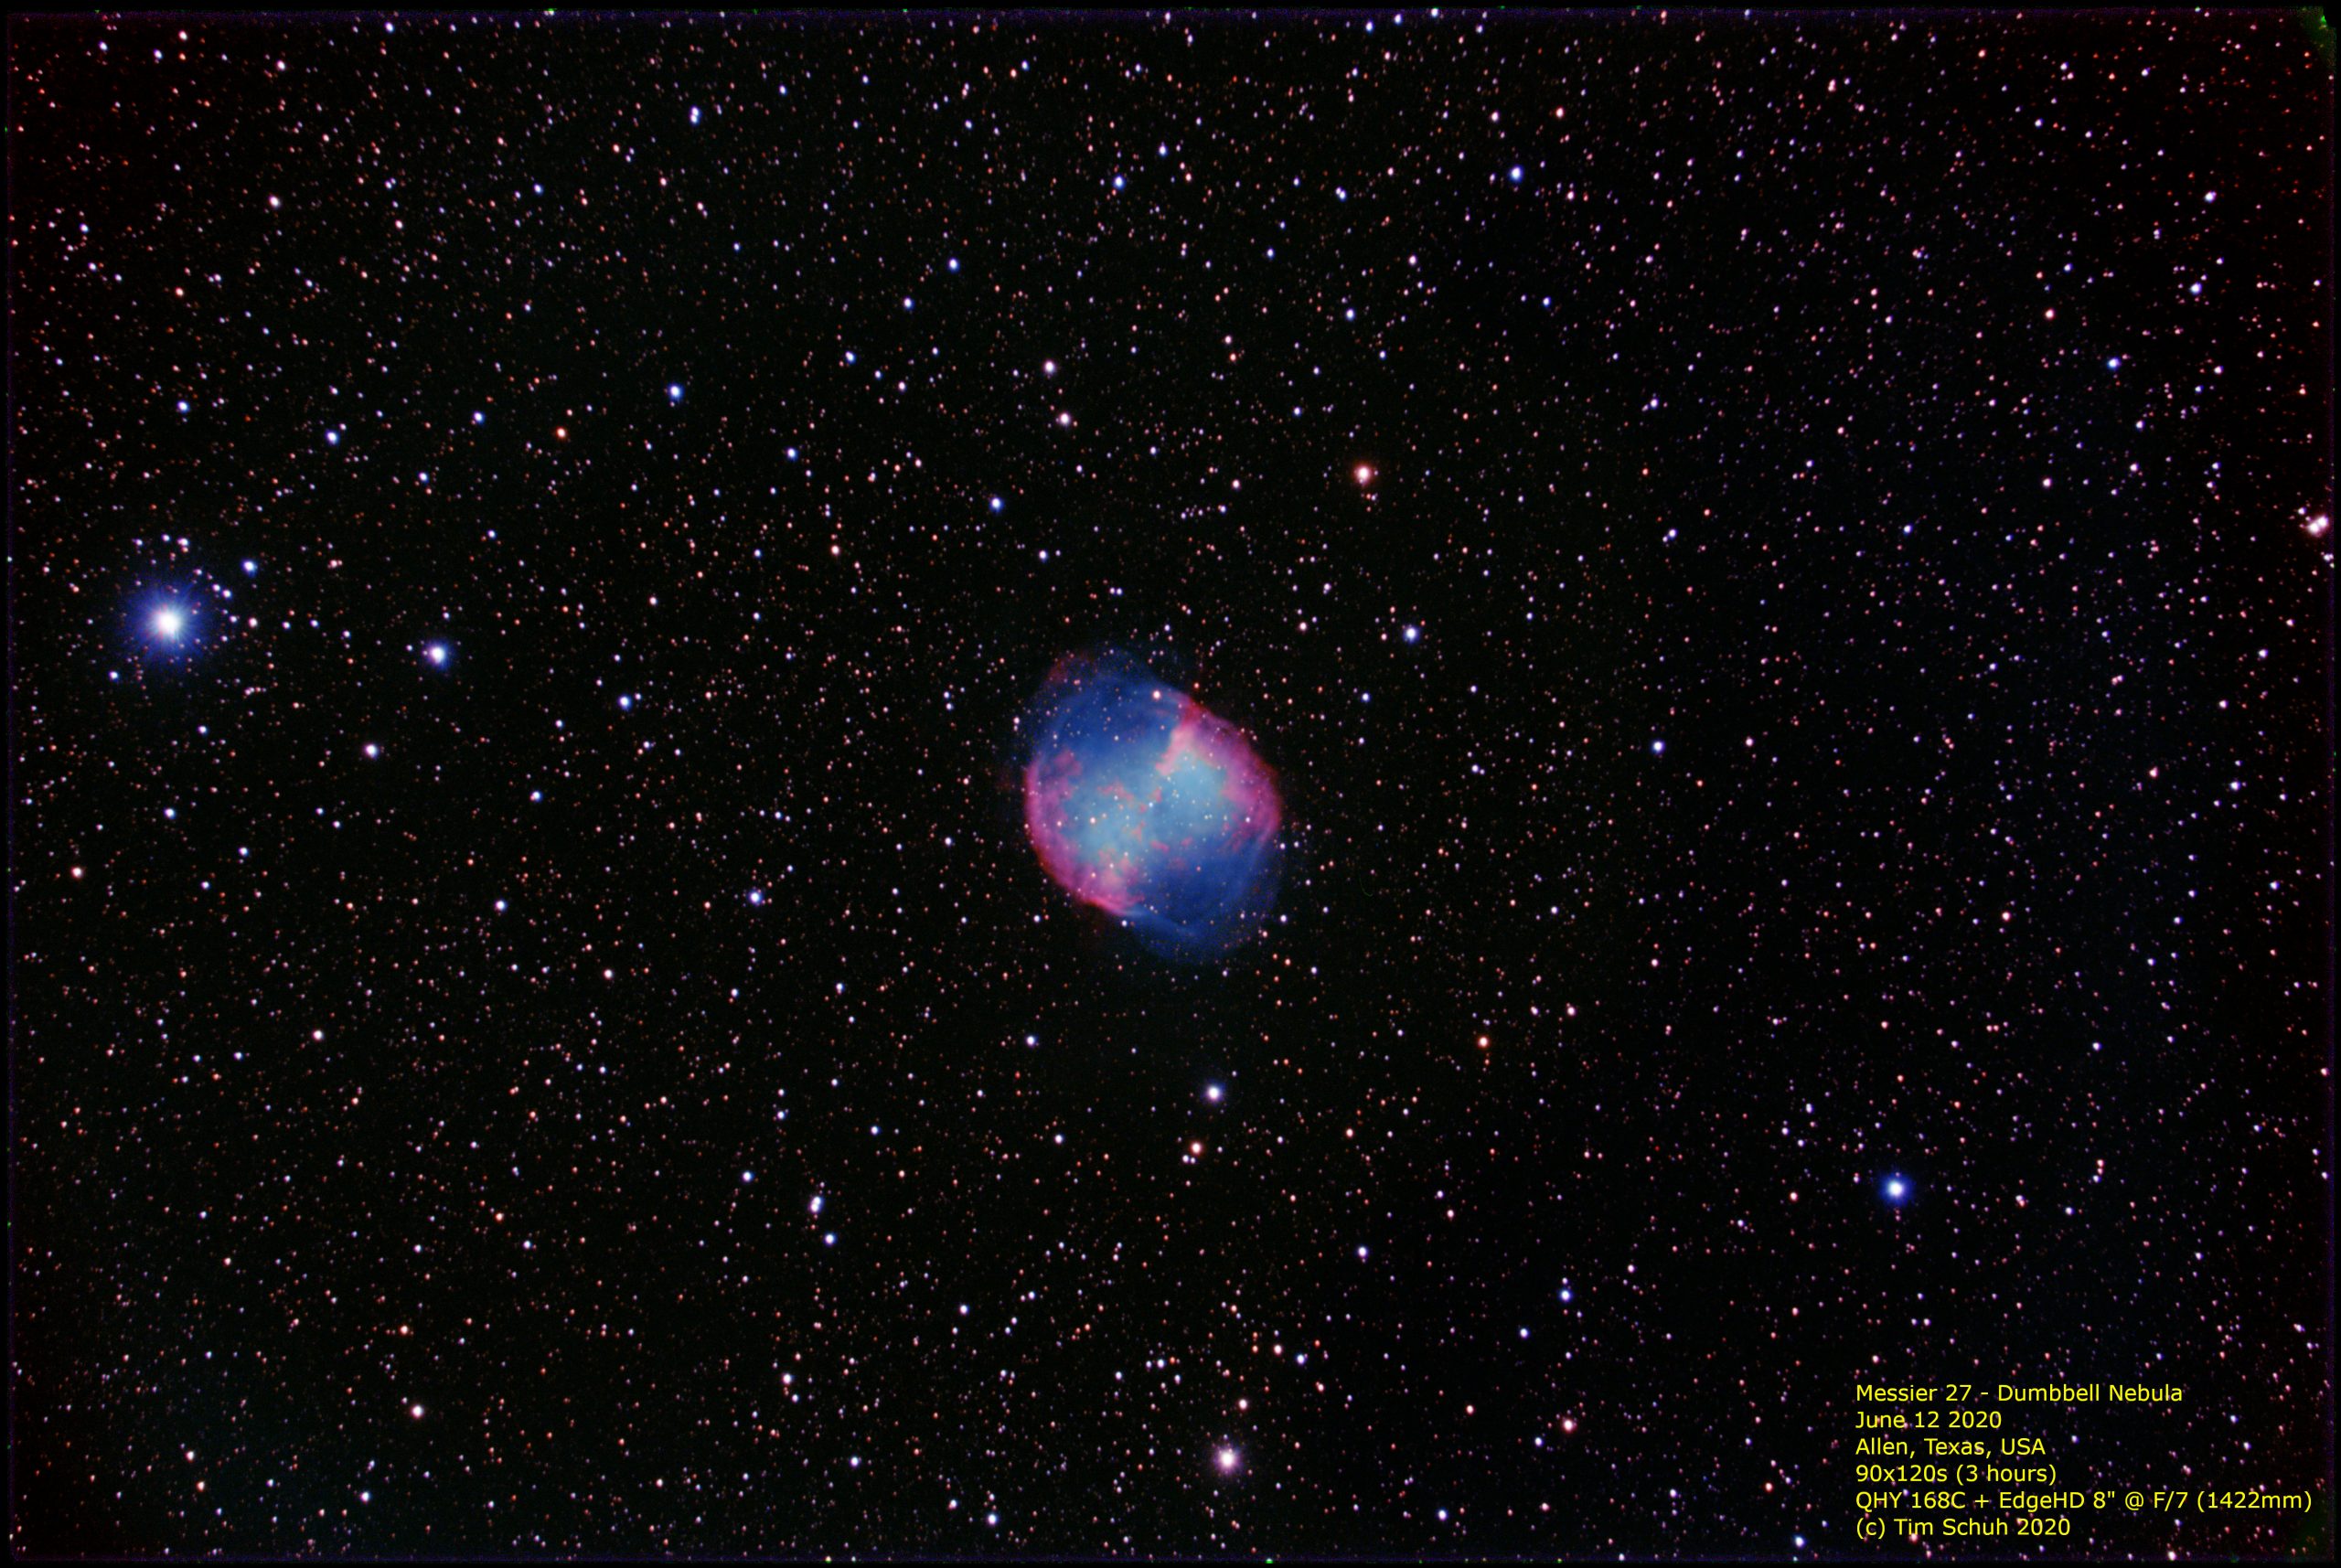
I intended to do a comparison of a couple of different Light Pollution filters but the weather hasn’t exactly cooperated. All I’ve got so far is 3 hours of data on M27 with a Hutech IDAS LPS-D2, my newest filter. I want to compare that as closely as possible with the older LPS-P2 to see how they differ from an imaging perspective.
3 hours (90 x 120sec) of data on a QHY168C through a Celestron EdgeHD 8″ at a focal length of 1422mm (F/7.0).
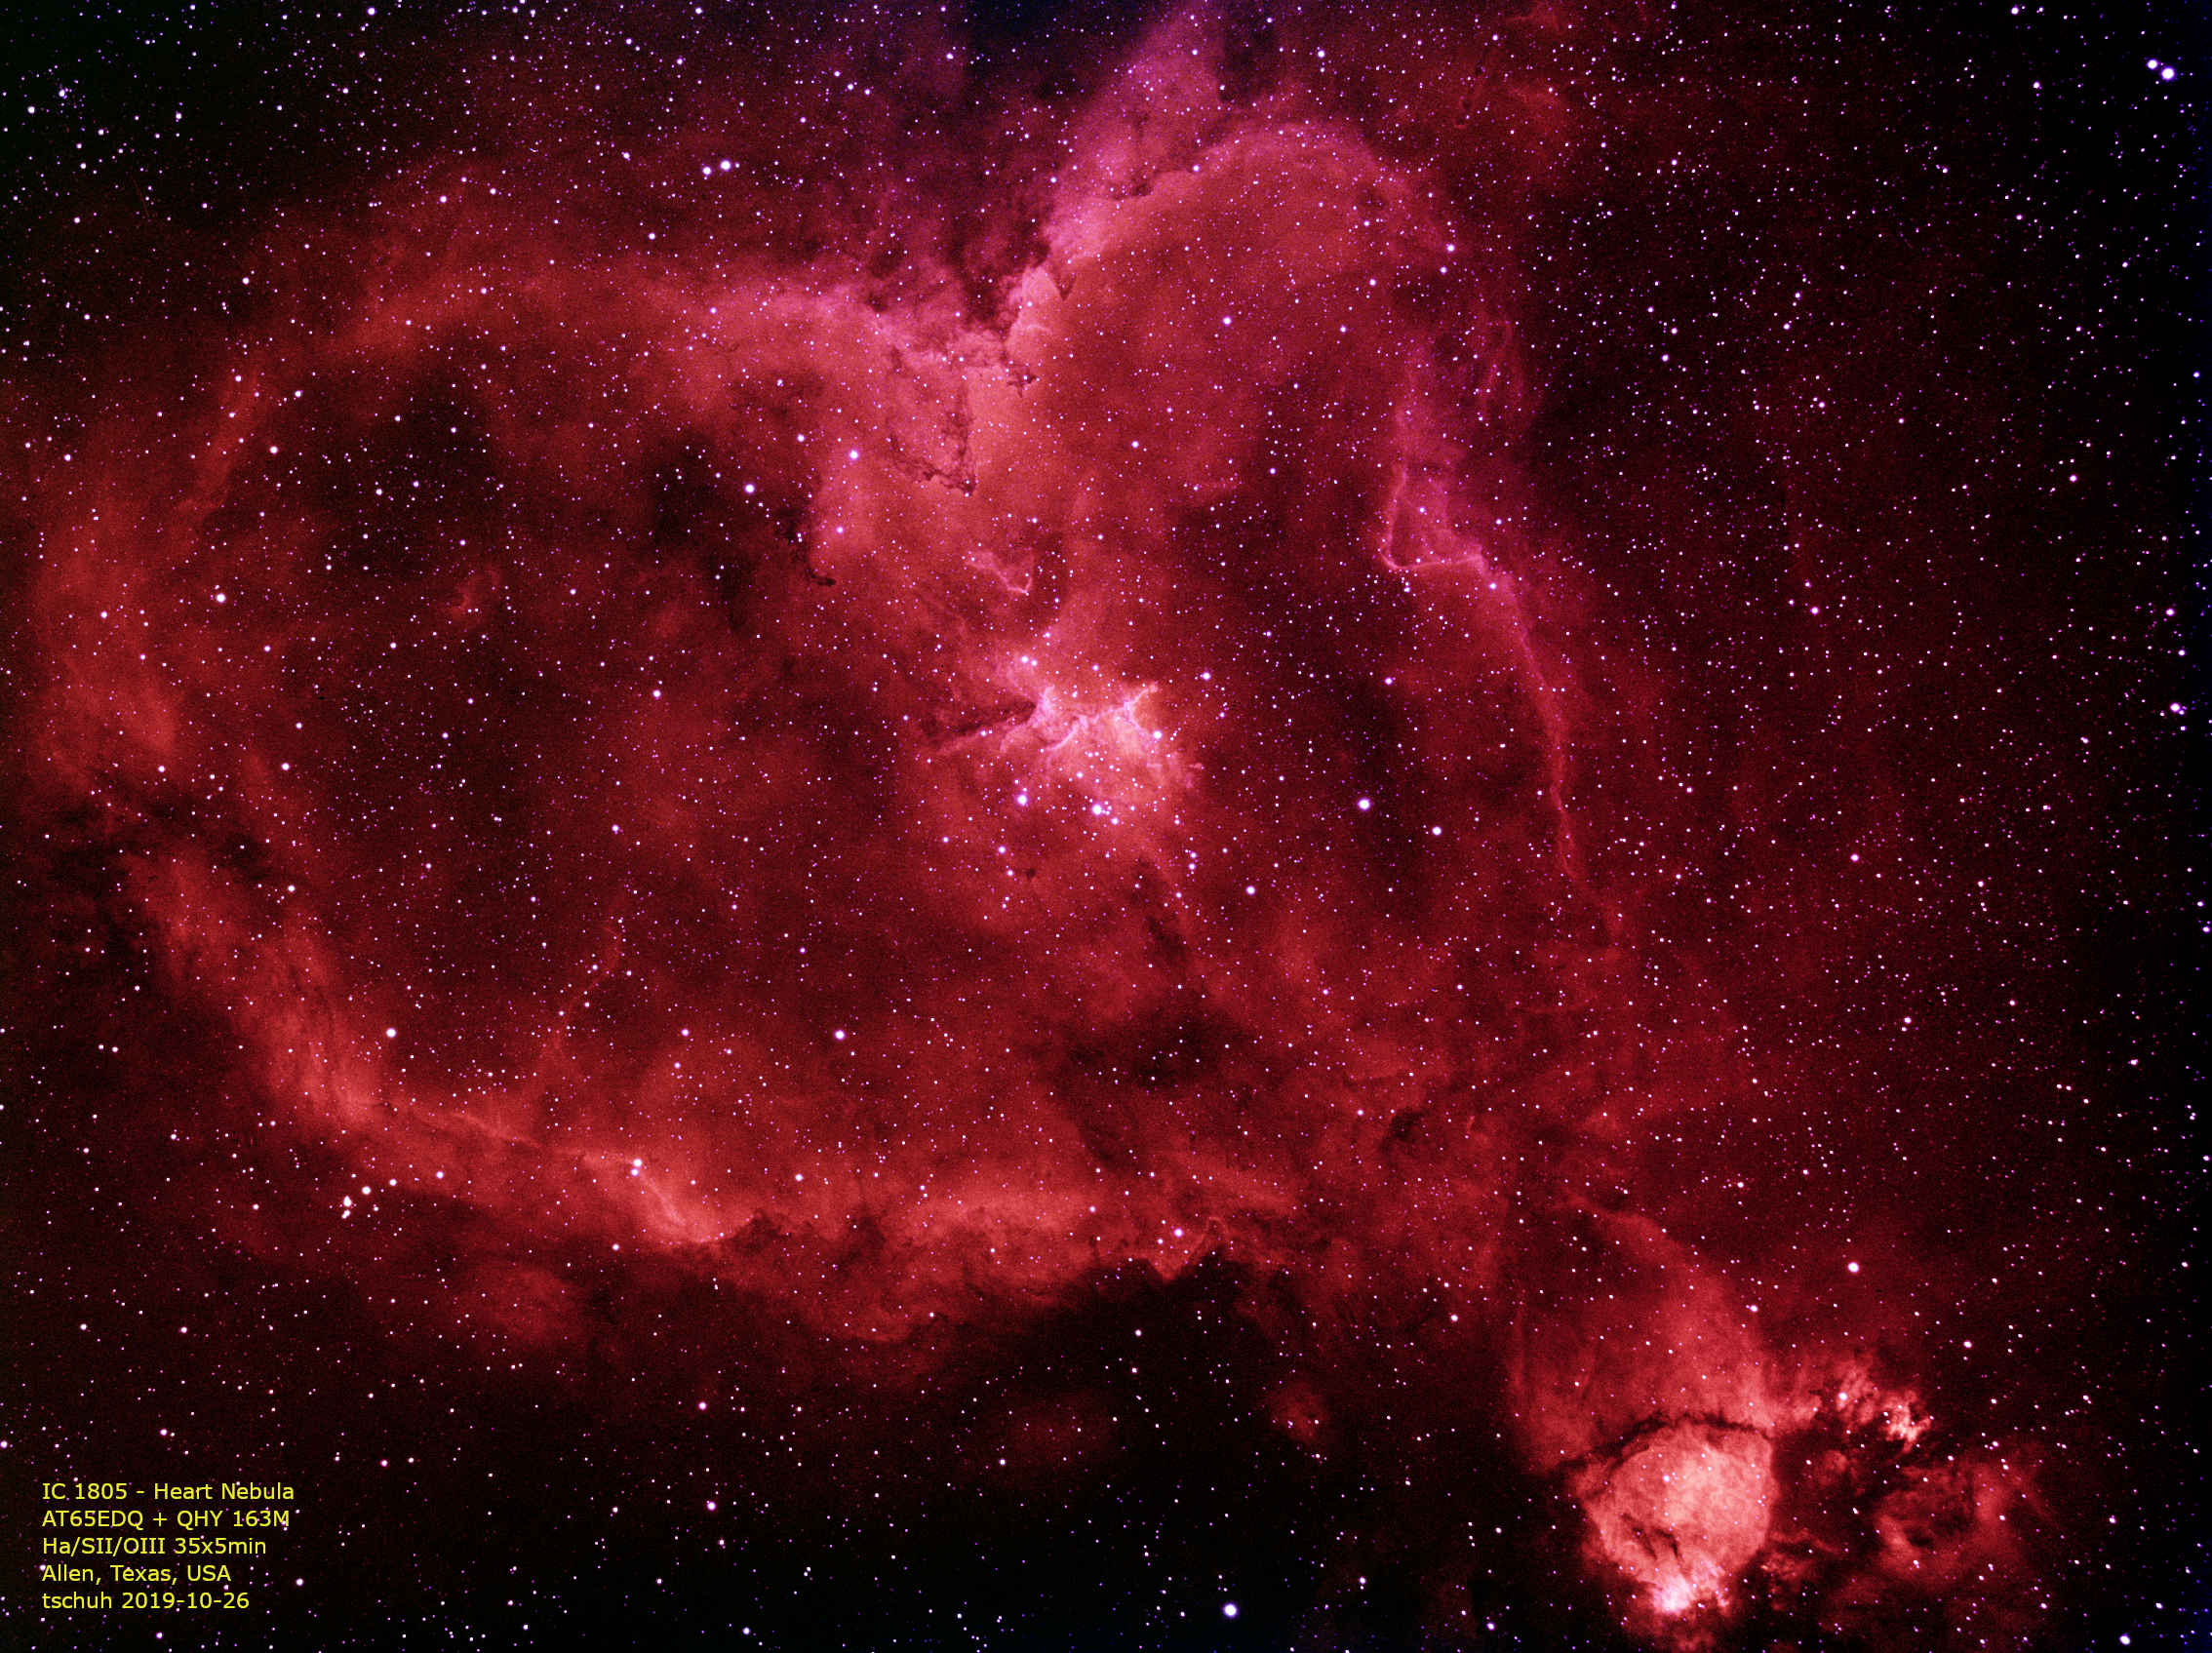
I finally got another monochrome camera after years of shooting color CCDs. I’m still re-learning the ropes, particularly using narrowband filters for very specific frequencies of light associated with ionized states of hydrogen, sulfur and oxygen. I’ll probably end up doing a lot of hydrogen and overlaying red, green and blue broadband filters over that but that’s another challenge for a different day.
For now, IC 1805 also known as the Heart Nebula. Data captured over the nights of Oct 26th through the 28th. Scope was my 65mm refractor and was imaged from my very bright suburban back yard.
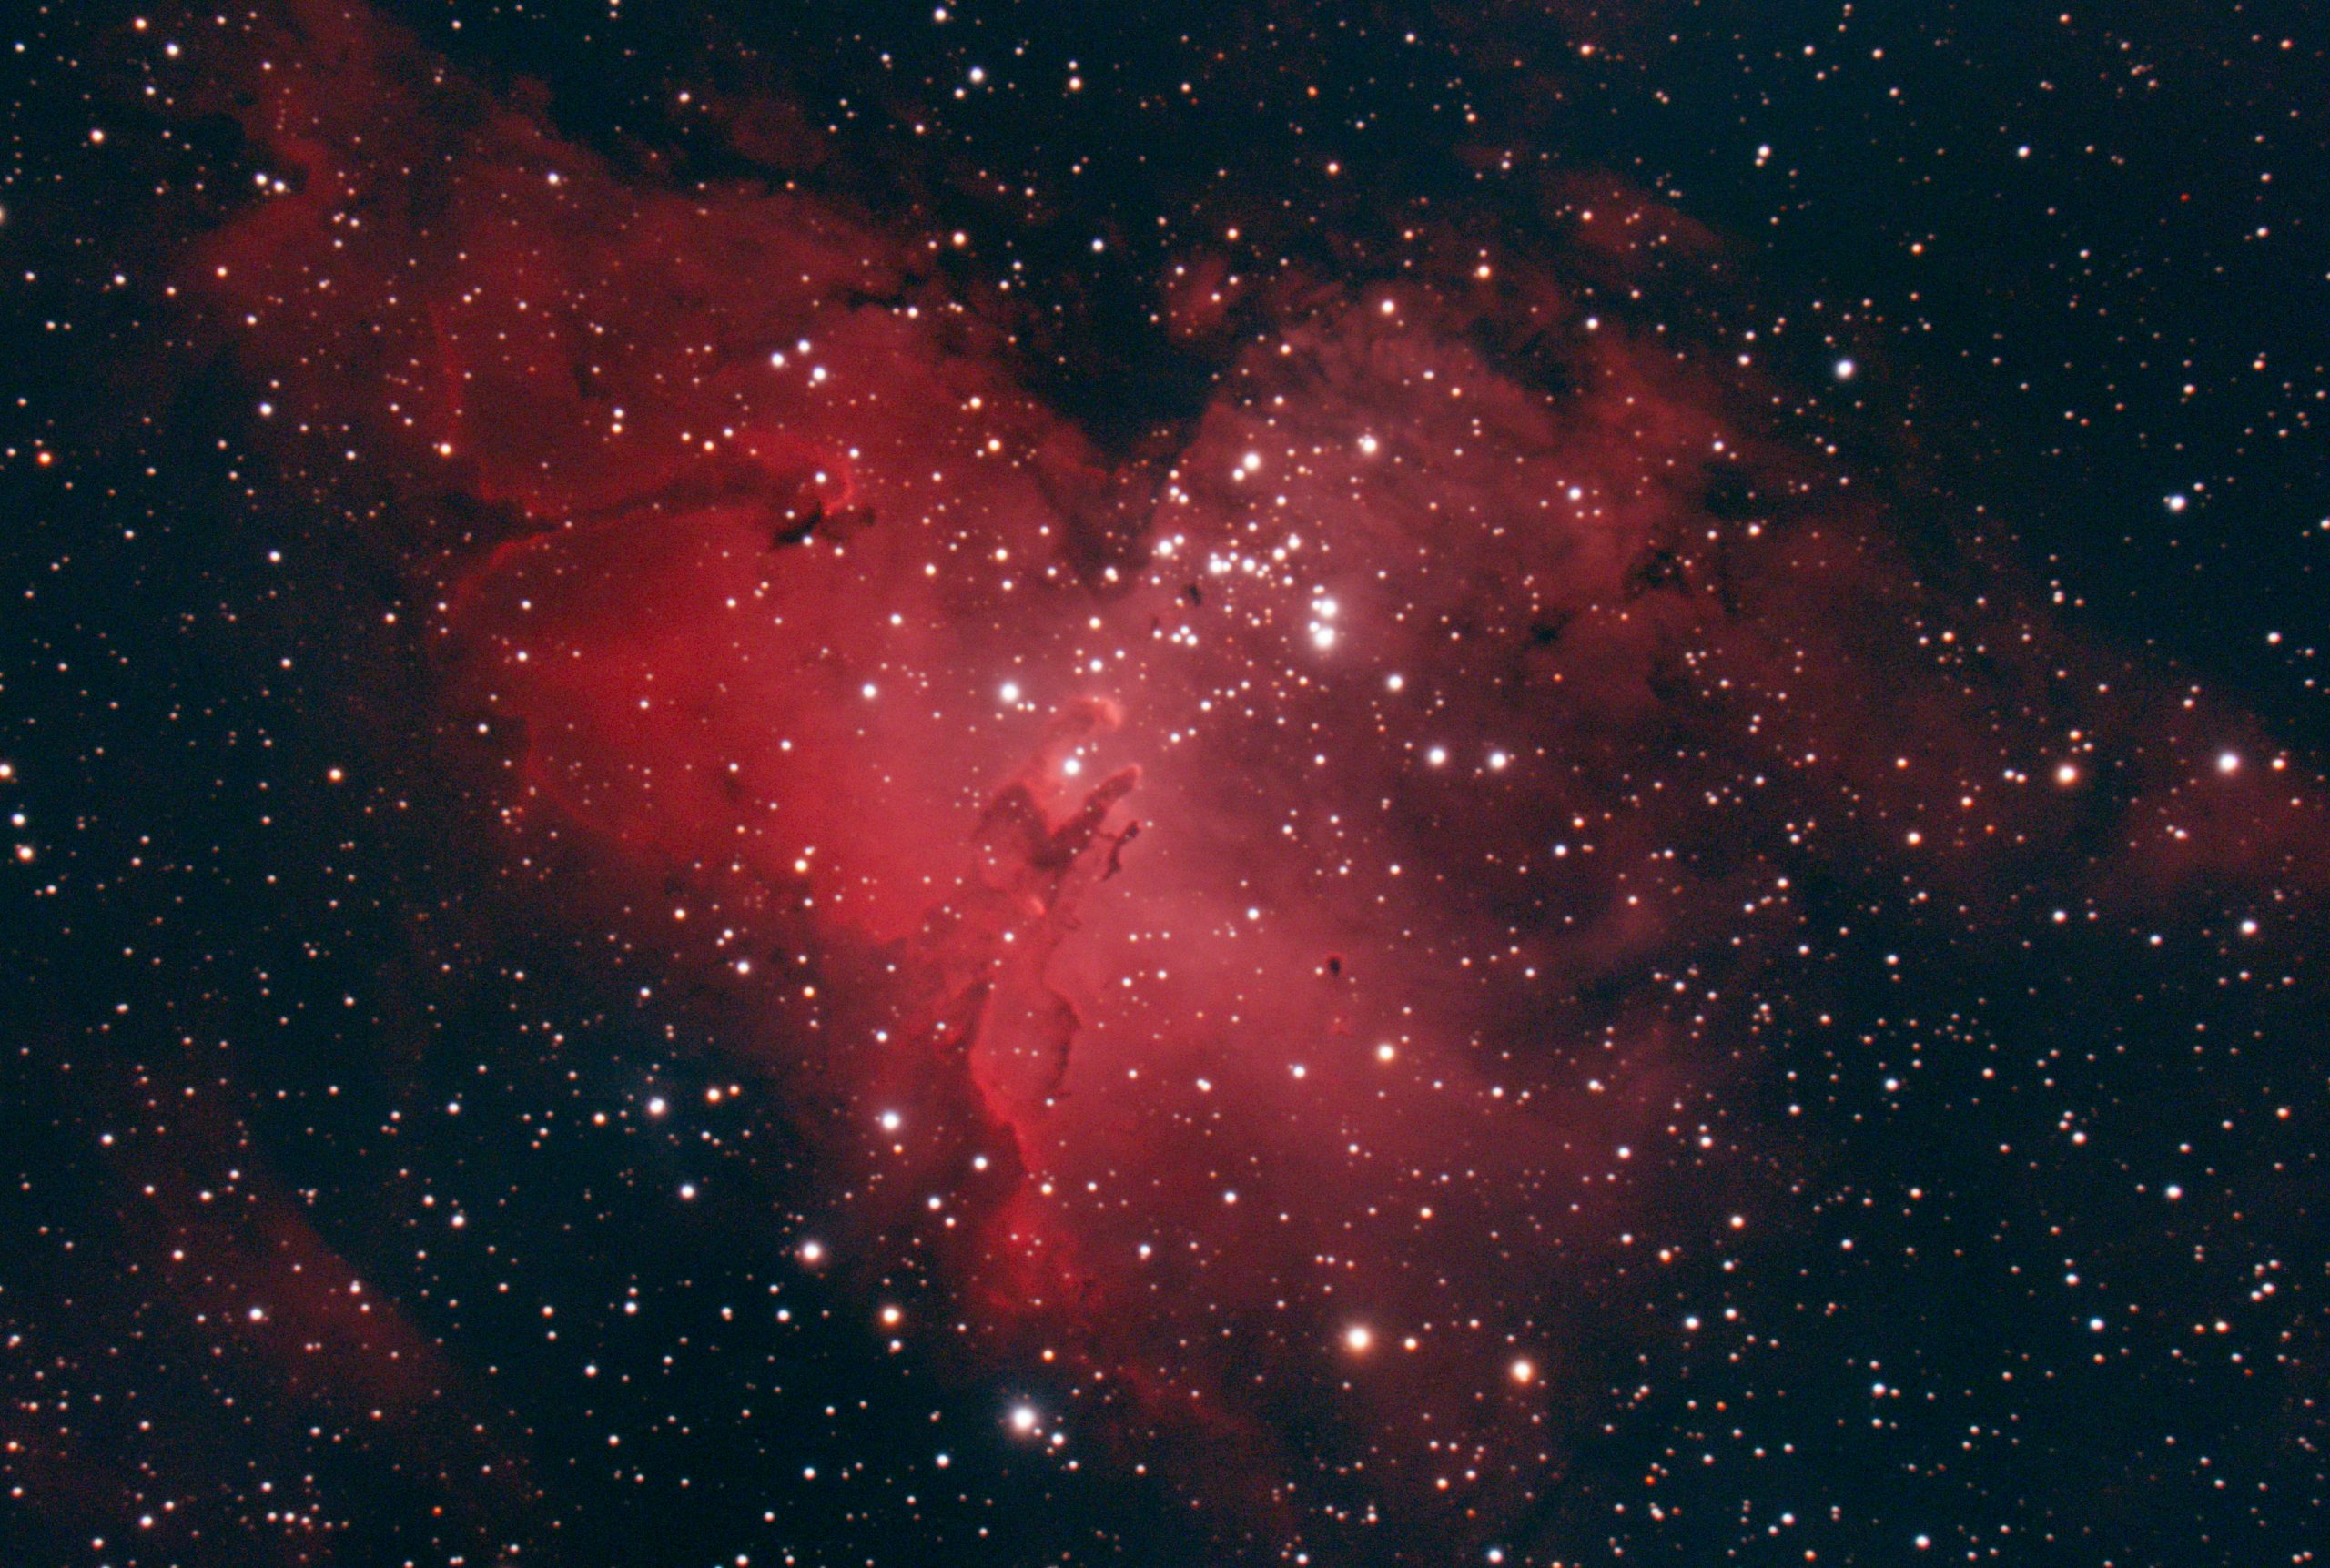
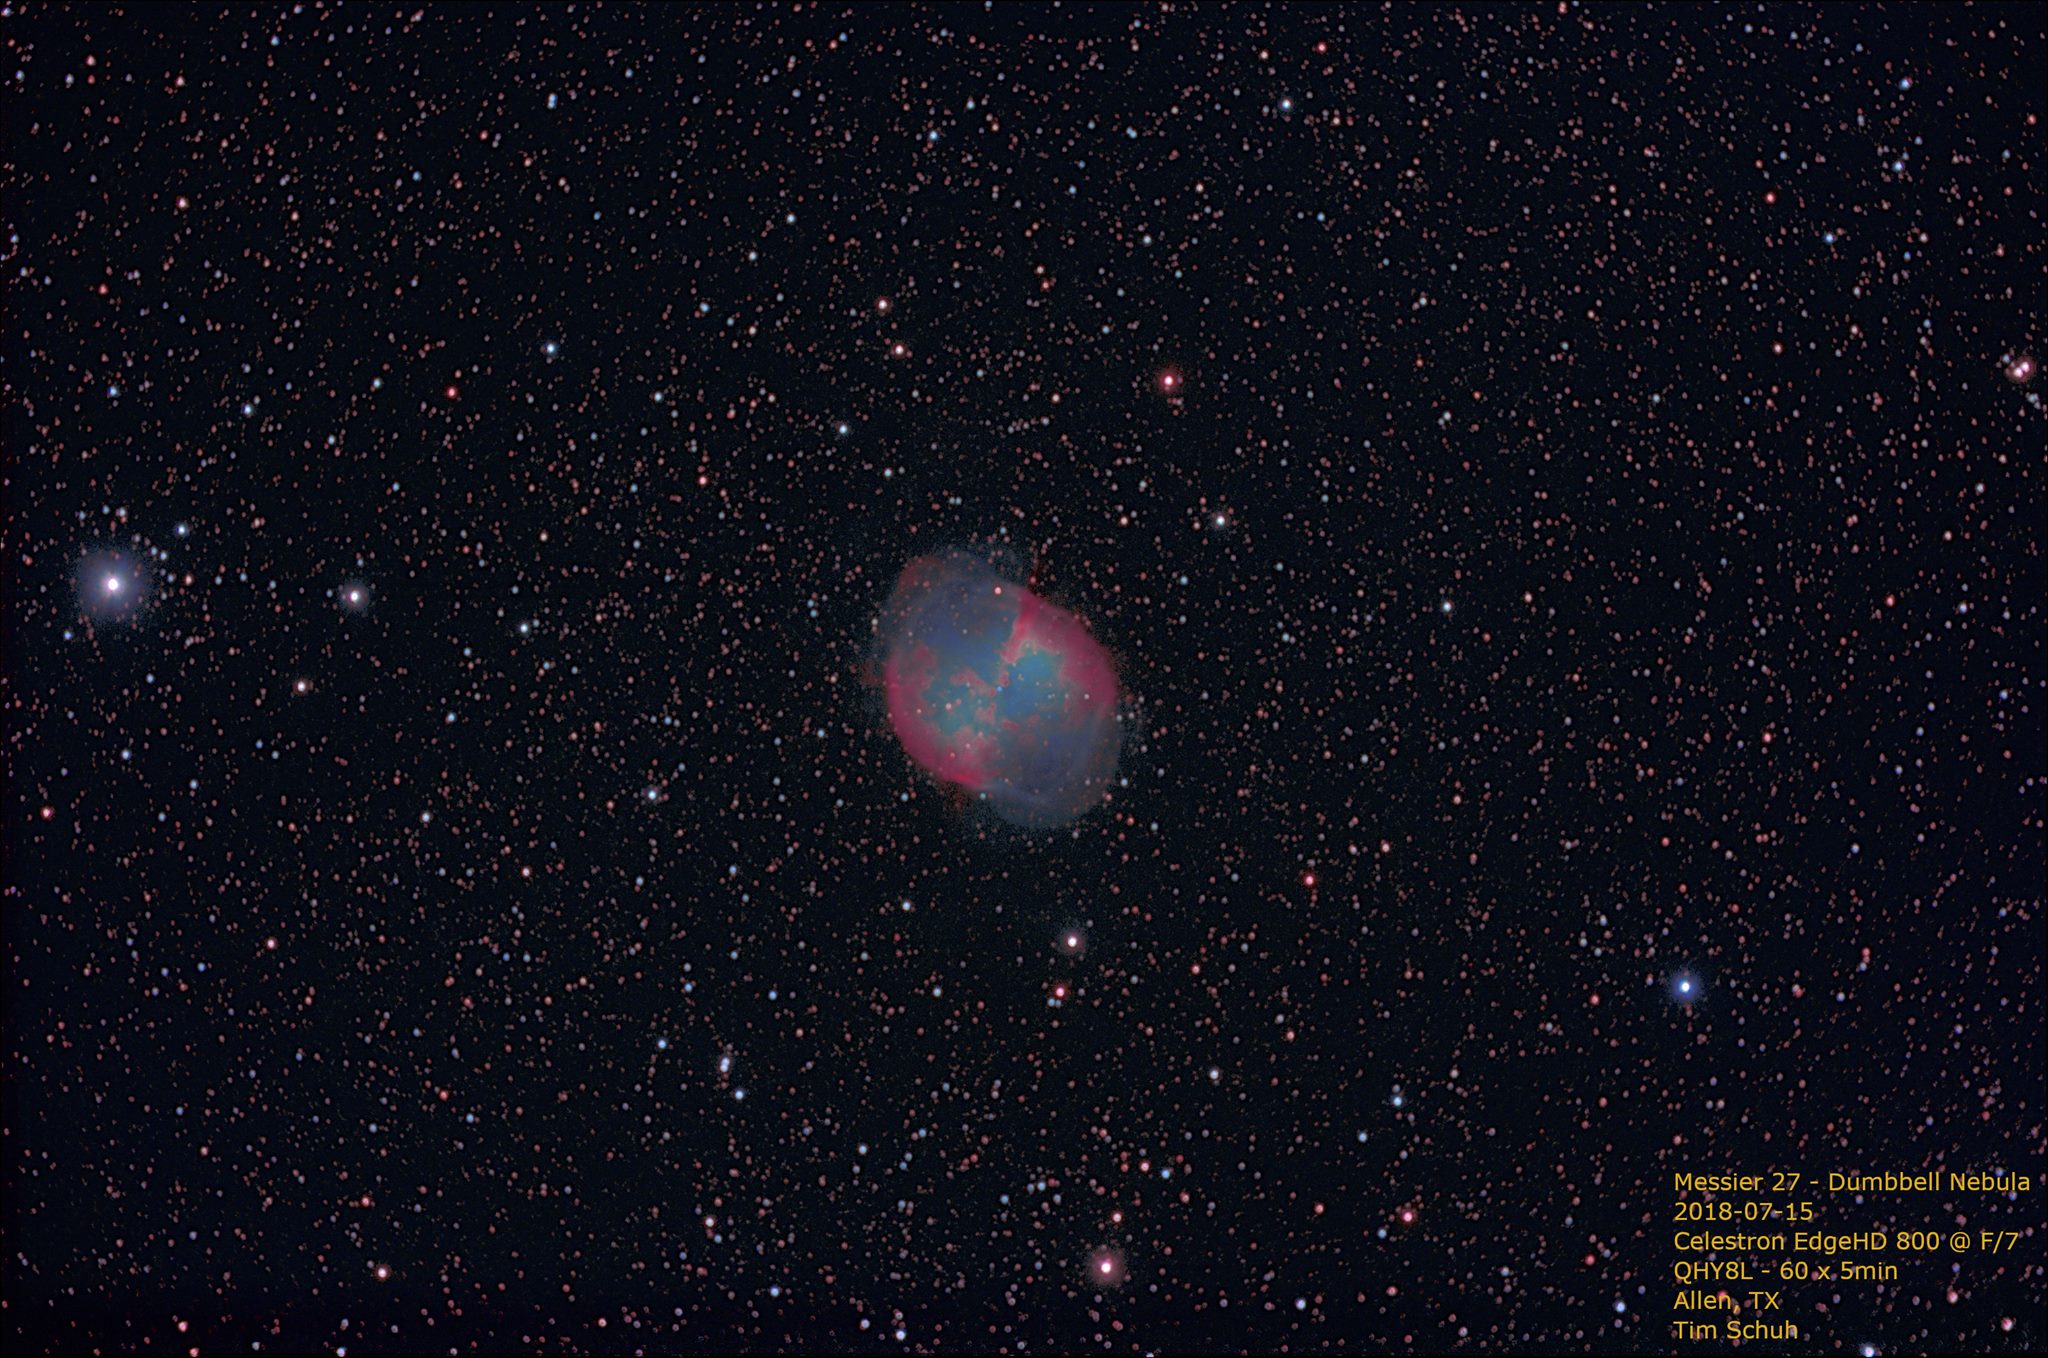
Image data collected over two nights on August 4th and 5th. A total of 6 hours of data, 73 exposures of 5 minutes collected on a QHY 8L CCD cooled to -15C. Scope is a Celestron EdgeHD @ f/10.
Seeing turbulence in the air) wasn’t great. Stars were twinkling away with the best of them which does compromise image quality fairly significantly. Still, I wanted to get M27 again since I re-calibrated the settings for my camera and learned a bit more about exactly how far is too far with a CCD. This is a quick process but sometimes those are the best.
Messier 27 is a ‘planetary’ nebula of highly energetic Hydrogen (red) and Oxygen(blue/green) in the northern constellation of Vulpecula (the Little Fox). What we see is the outer shell of a dying star of about half our Sun’s mass. This is how our star will die, in about another 5 billion years. This nebula is relatively close at 1,360 light years distance. Observations of this nebula put the expansion rate of the gas cloud at about 31km per second in a 1970 study. That puts the age of the nebula at about 9,800 years.


